ComfyUI Flux Kontext Dev Native Workflow Examples
FLUX.1 Kontext from Black Forest Labs is a multimodal image-editing model that takes text and images together, understands the image context and makes precise edits. The dev version is an open-source 12-billion-parameter diffusion transformer.
Translated by AI
Original: https://docs.comfy.org/tutorials/flux/flux-1-kontext-dev, by the official ComfyUI community
FLUX.1 Kontext is a breakthrough multimodal image-editing model from Black Forest Labs. It accepts text and images as input together, understands the image context and makes precise edits. The dev version is an open-source diffusion transformer with 12 billion parameters. It understands context well and keeps characters consistent: even after many rounds of editing, key elements such as facial features and composition stay stable.
It shares the core abilities of the FLUX.1 Kontext suite. Character consistency: keeps the distinctive elements of an image, such as a reference character or object, across scenes and settings. Local editing: changes specific elements without affecting the rest. Style reference: generates new scenes from a text prompt while keeping the distinctive style of a reference image. Interactive speed: very low latency for generation and editing.
The previously released API versions offer the highest fidelity and speed, but FLUX.1 Kontext [dev] runs entirely on your own machine, giving developers, researchers and advanced users unmatched flexibility to experiment.
Versions
- FLUX.1 Kontext [pro]: commercial version, focused on fast iterative editing
- FLUX.1 Kontext [max]: experimental version with stronger prompt adherence
- FLUX.1 Kontext [dev]: open-source version (used in this tutorial), 12B parameters, mainly for research
ComfyUI supports all of these. The Pro and Max versions are available through API nodes; for the open-source Dev version, follow this guide.
About the workflows
This tutorial covers two kinds of workflow, which are essentially the same:
- One uses the group node FLUX.1 Kontext Image Edit, which keeps the interface simple and makes the workflow easy to reuse.
- The other doesn’t use a group node and is the complete original workflow.
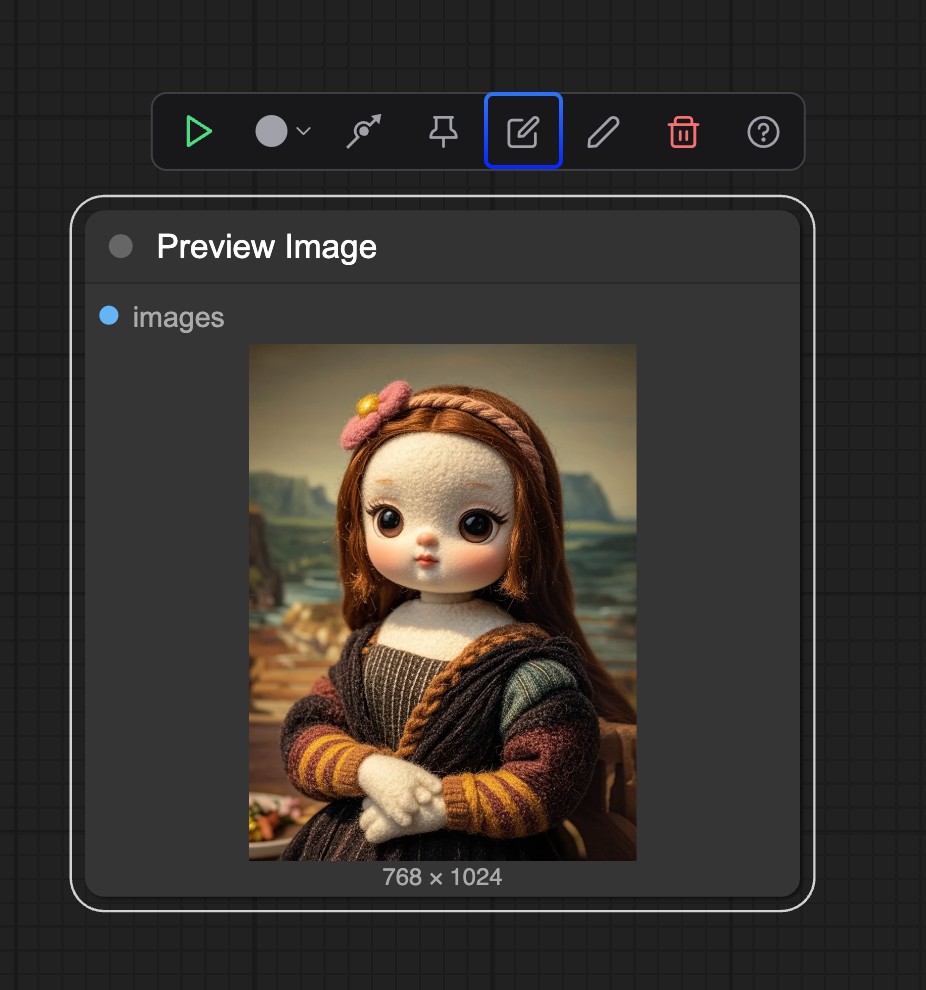
The main advantage of the group node is a cleaner workflow: you can reuse it to build complex workflows quickly. The new front end also adds a shortcut for inserting the Flux.1 Kontext Dev group node:
Model downloads
To run the workflows in this guide, first download the model files below. You can also load the workflow and get the download links from it, since the workflows include the model download information.
Diffusion model
VAE
Text encoders
Where to put the models
📂 ComfyUI/
├── 📂 models/
│   ├── 📂 diffusion_models/
│   │   └── flux1-dev-kontext_fp8_scaled.safetensors
│   ├── 📂 vae/
│   │   └── ae.safetensor
│   └── 📂 text_encoders/
│       ├── clip_l.safetensors
│       └── t5xxl_fp16.safetensors or t5xxl_fp8_e4m3fn_scaled.safetensors
Flux.1 Kontext Dev basic workflow
This is a standard workflow, but it uses the Load Image(from output) node to load the image to edit, which makes it easy to pick up the edited image for further rounds of editing.
1. Download the workflow and input image
Download the files below and drag them into ComfyUI to load the workflow.

Input image

2. Run the workflow step by step
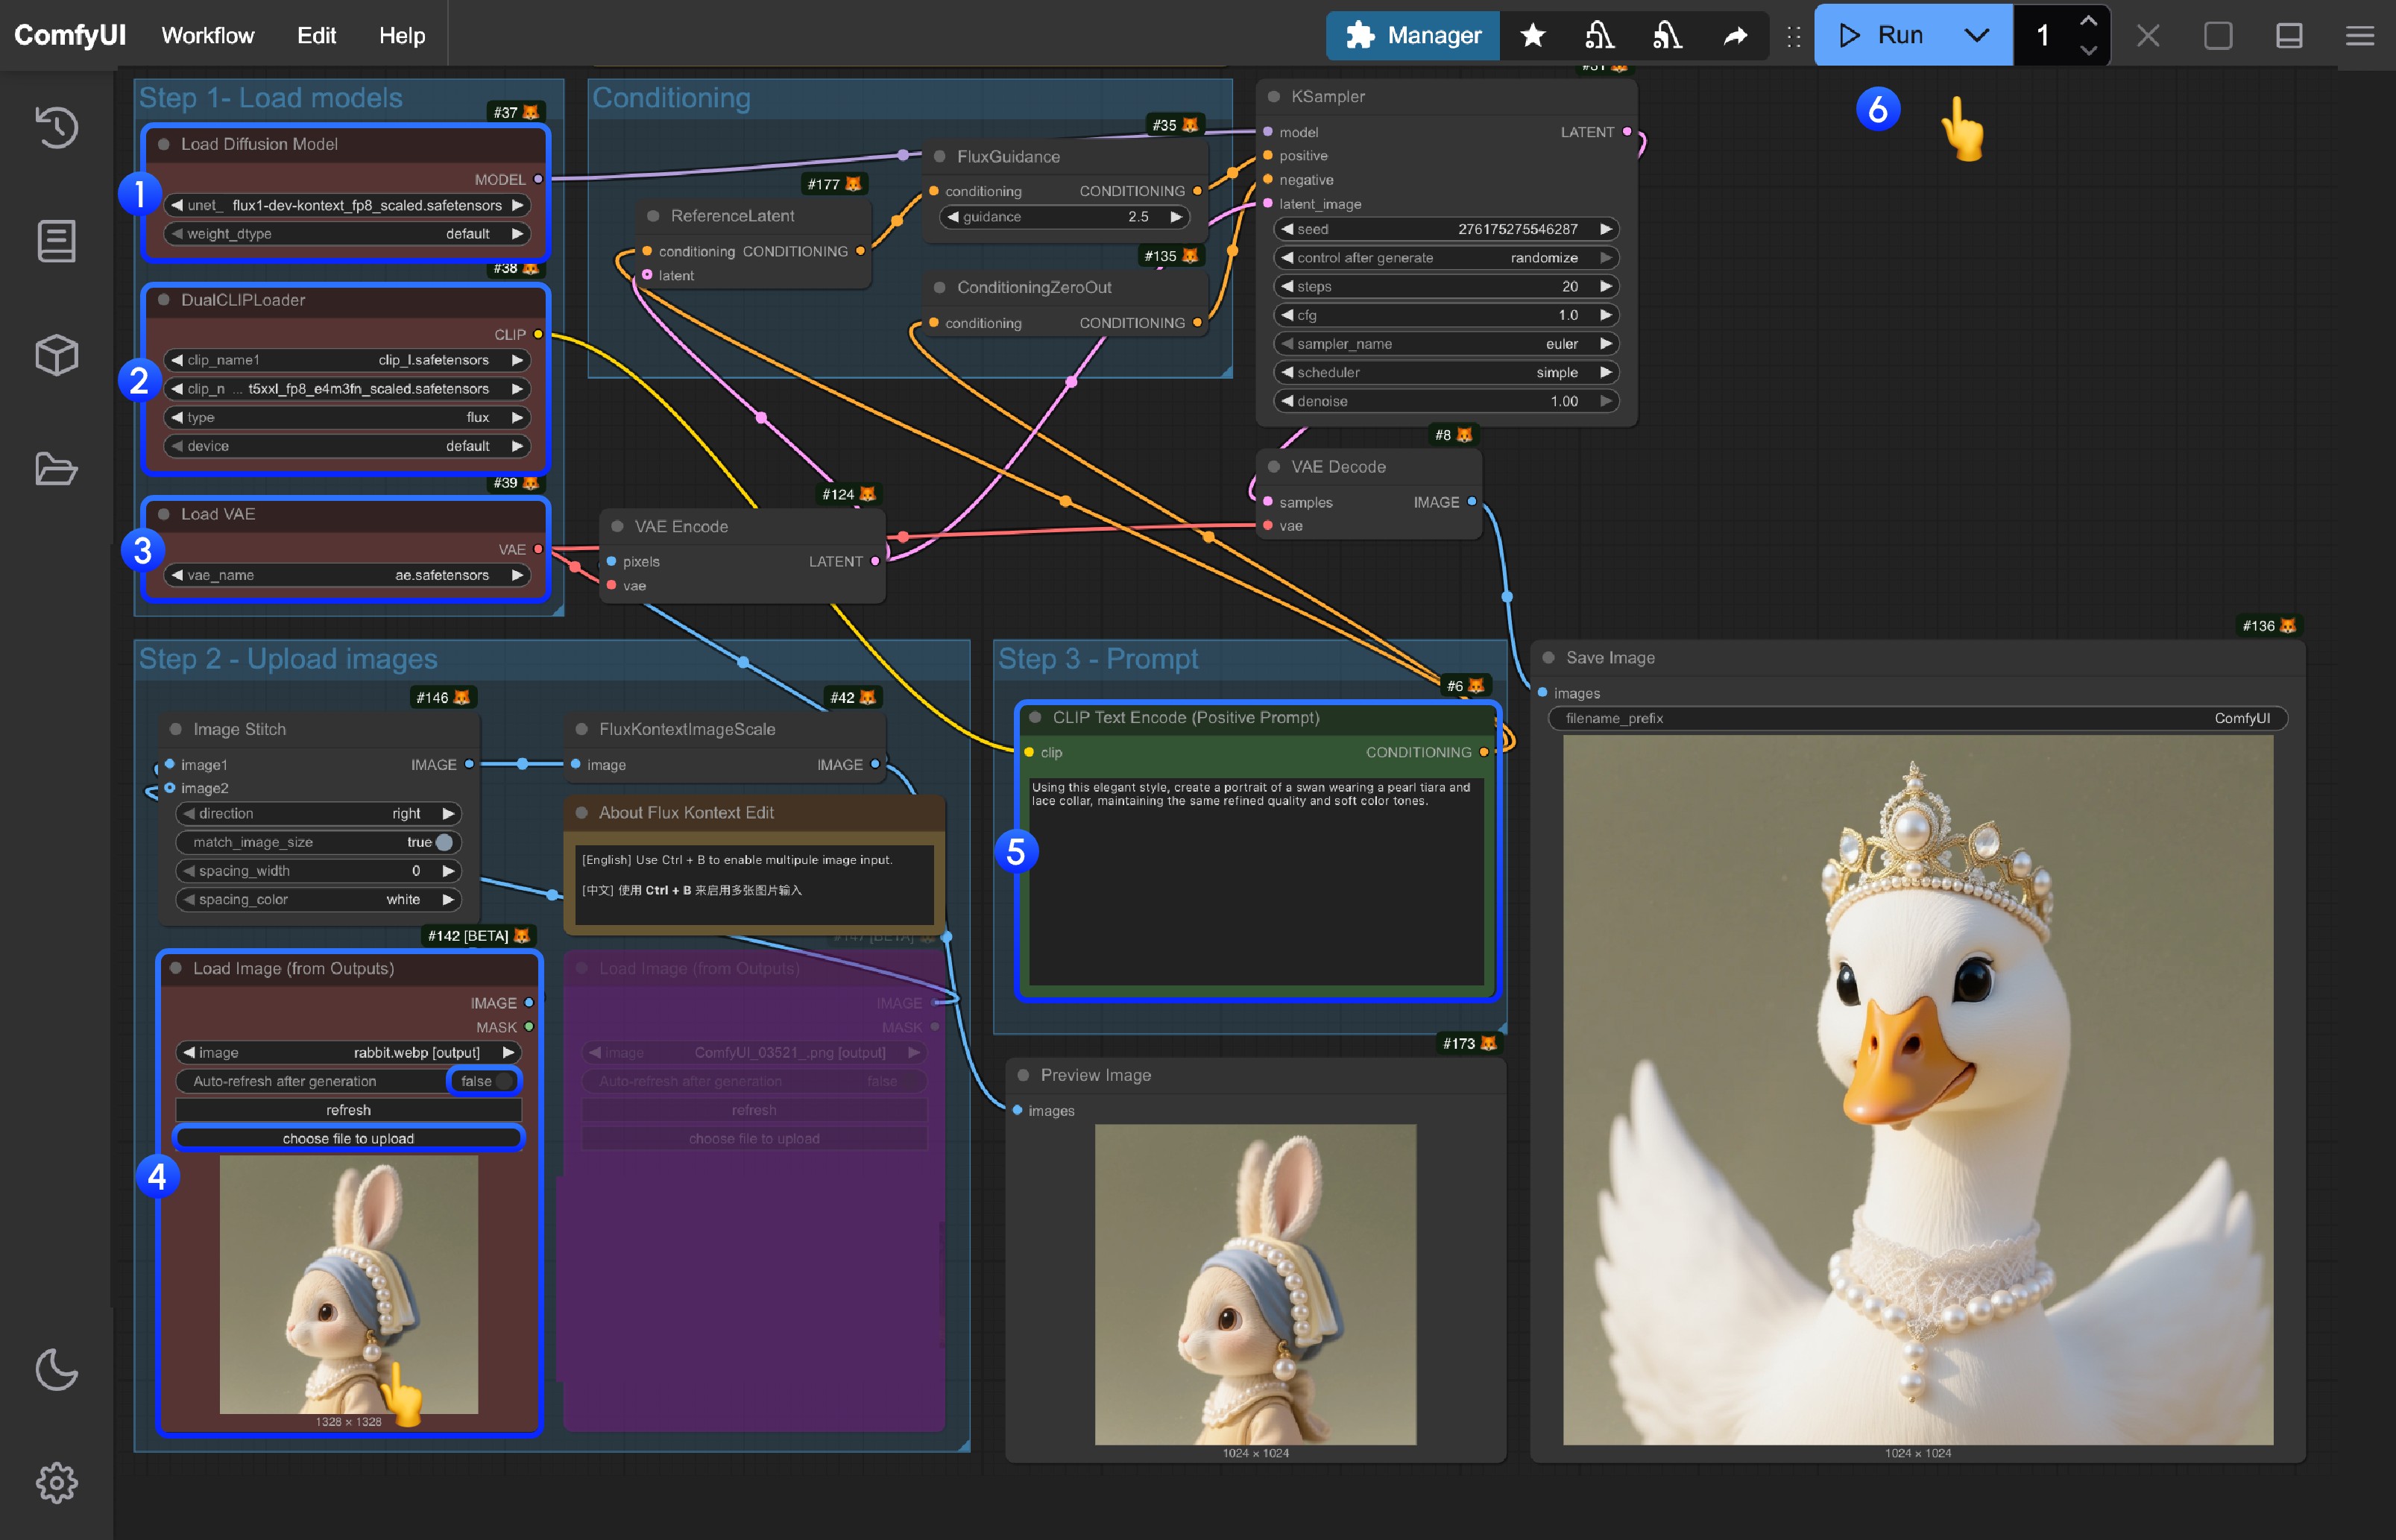
Follow the numbers in the image:
- In the
Load Diffusion Modelnode, loadflux1-dev-kontext_fp8_scaled.safetensors - In the
DualCLIP Loadnode, make sureclip_l.safetensorsandt5xxl_fp16.safetensorsort5xxl_fp8_e4m3fn_scaled.safetensorsare loaded - In the
Load VAEnode, make sureae.safetensorsis loaded - In the
Load Image(from output)node, load the input image provided - Edit the prompt in the
CLIP Text Encodenode (English only) - Click
Queue, or pressCtrl(Cmd) + Enter, to run the workflow
Flux.1 Kontext Dev grouped workflow
This workflow uses the group node FLUX.1 Kontext Image Edit, which keeps the interface simple and the workflow easy to reuse.
It also takes two input images, stitches them into one with the Image Stitch node, and edits the result with Flux.1 Kontext.
1. Download the workflow and input images
Download the files below and drag them into ComfyUI to load the workflow.

Input images


2. Run the workflow step by step
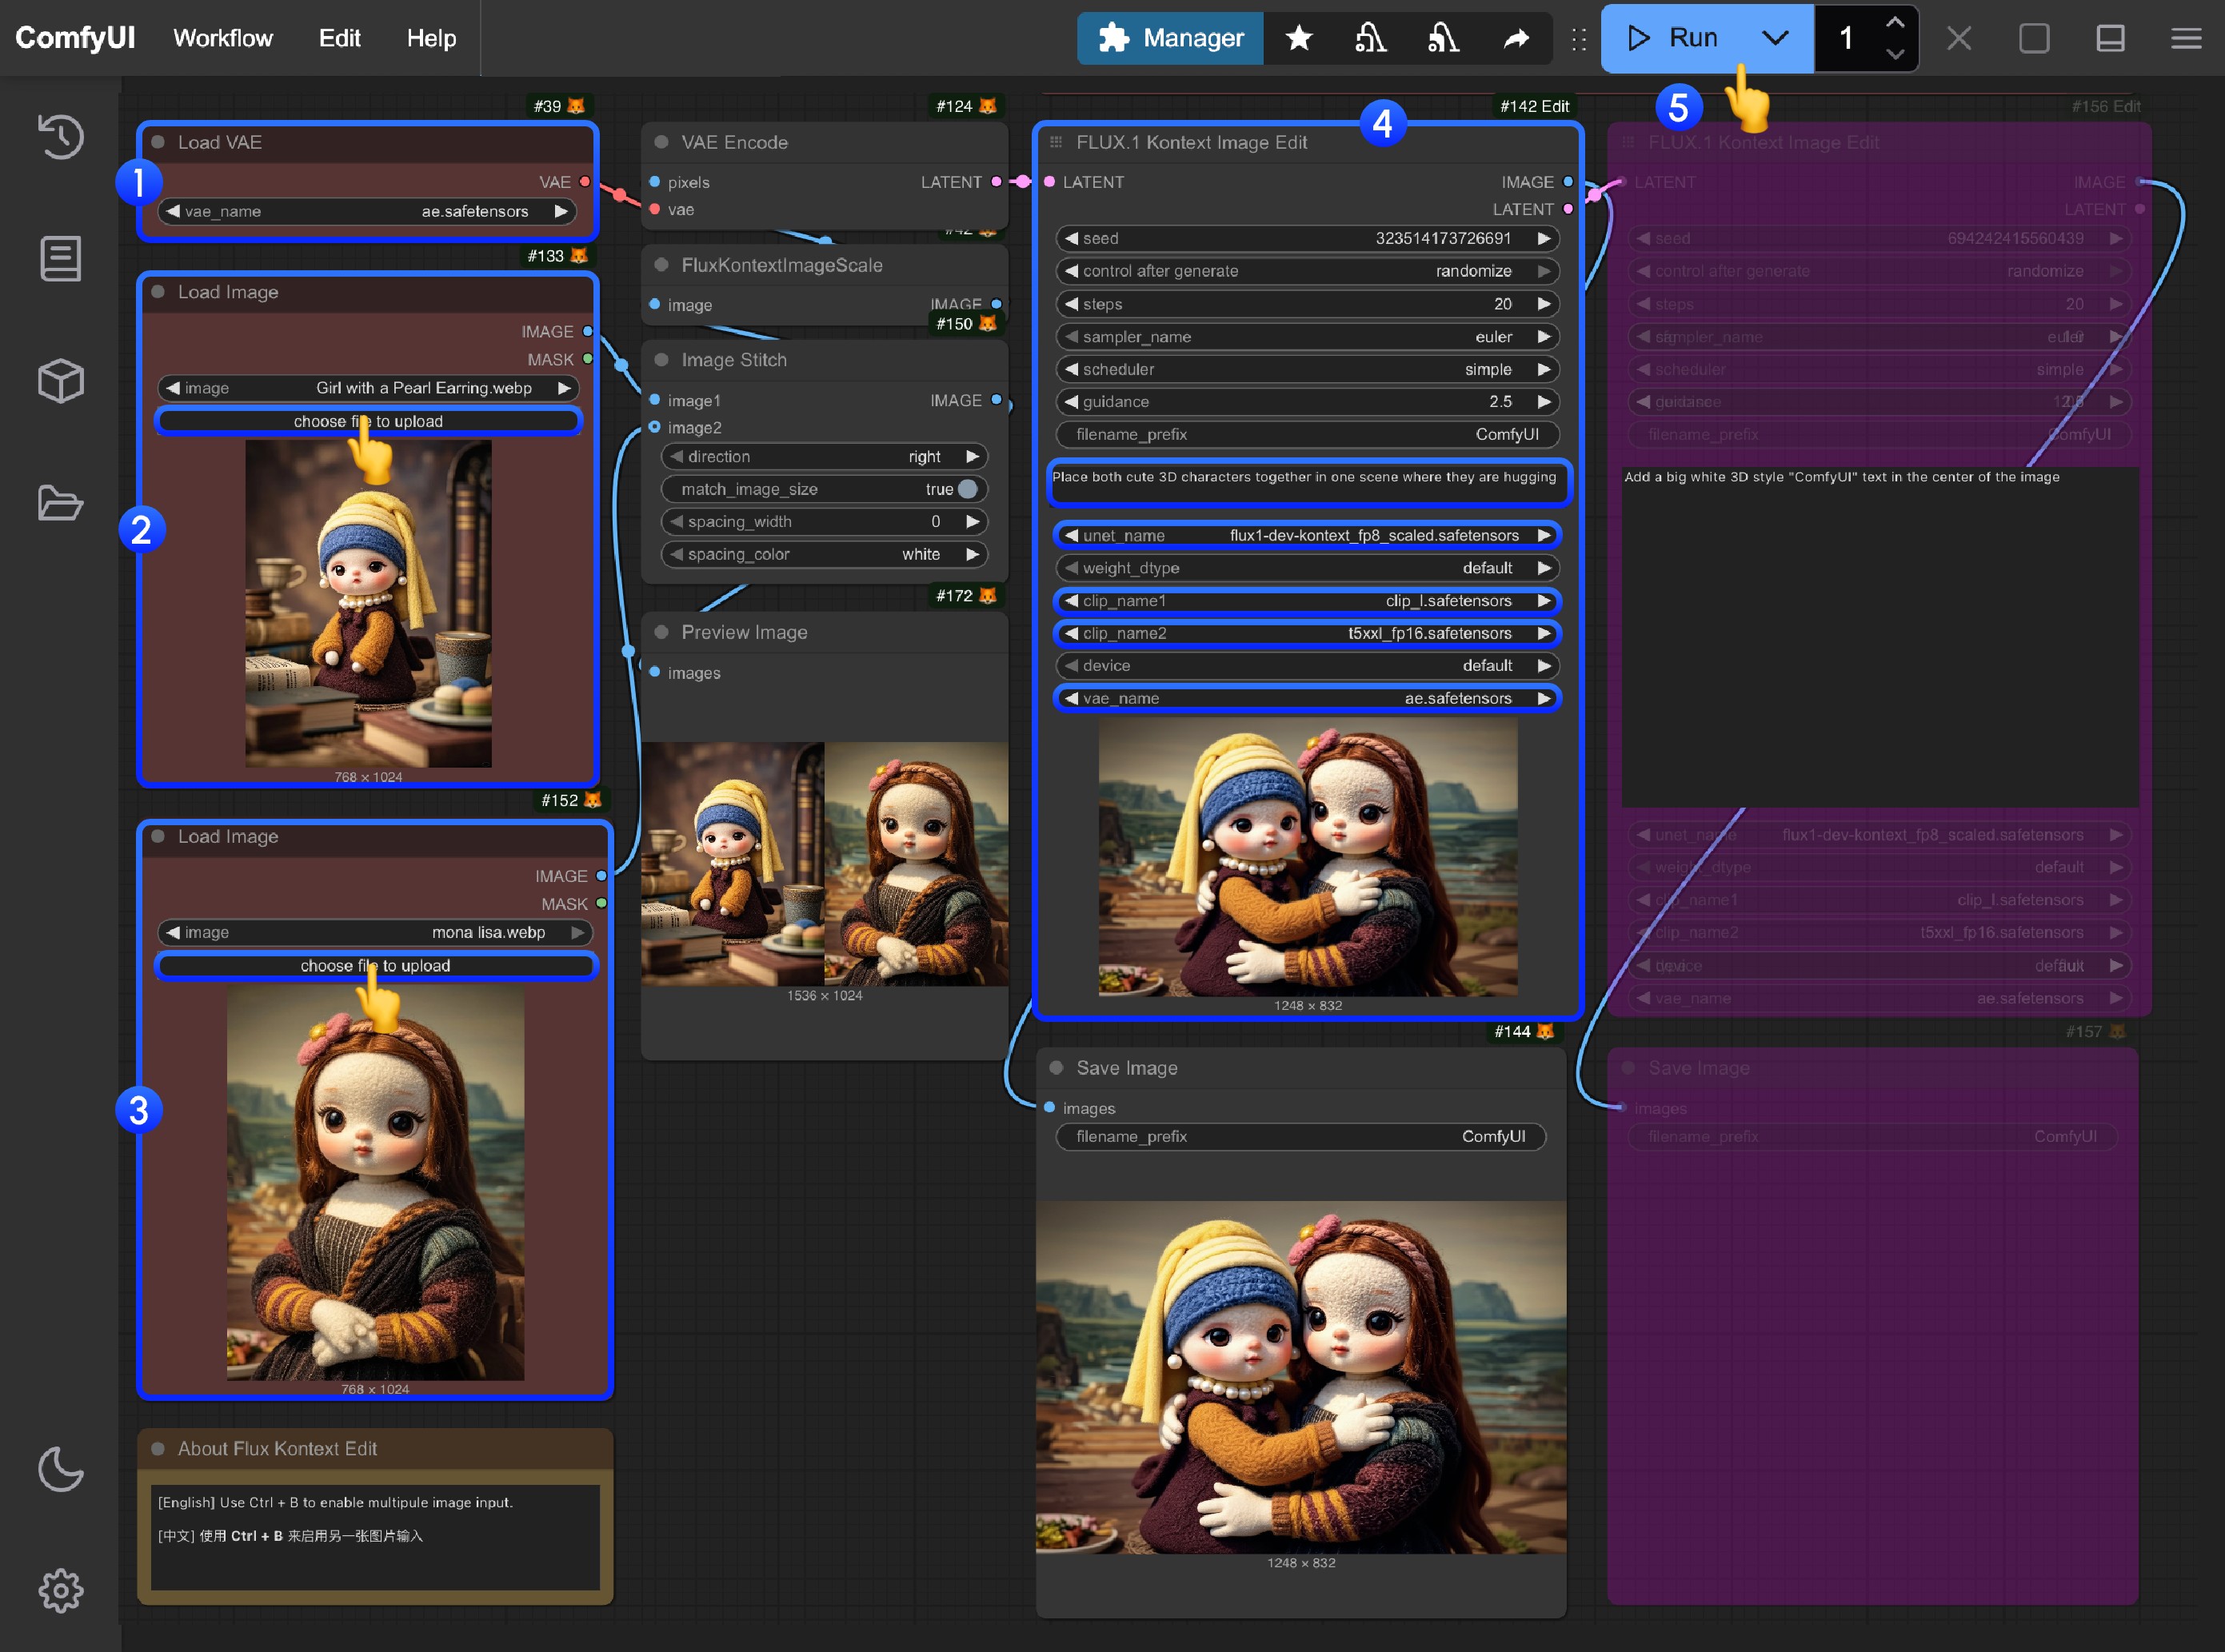
Follow the numbers in the image:
- In the
Load VAEnode, loadae.safetensors - In the first
Load Imagenode, load the first input image - In the second
Load Imagenode, load the second input image - The other models and nodes are packed into the group node, so check against the step image that the right models are loaded, and write your prompt
- Click
Queue, or pressCtrl(Cmd) + Enter, to run the workflow
New: Flux.1 Kontext Dev in the selection toolbox
To make editing with Flux.1 Kontext easier, a selection toolbox has been added for quickly inserting the FLUX.1 Kontext Image Edit group node. When you select a Load Image node, you’ll find the new edit button in the selection toolbox.
Flux Kontext prompting tips
1. Basic edits
- Keep it simple and direct:
"Change the car color to red" - Preserve the style:
"Change to daytime while maintaining the same style of the painting"
2. Style transfer
Principles:
- Name the style explicitly:
"Transform to Bauhaus art style" - Describe its characteristics:
"Transform to oil painting with visible brushstrokes, thick paint texture" - Preserve the composition:
"Change to Bauhaus style while maintaining the original composition"
3. Character consistency
Framework:
- Be specific:
"The woman with short black hair"rather than"she" - Preserve features:
"while maintaining the same facial features, hairstyle, and expression" - Edit in steps: change the background first, then the action
4. Editing text
- Use quotation marks:
"Replace 'joy' with 'BFL'" - Keep the format:
"Replace text while maintaining the same font style"
Troubleshooting
The character changes too much
❌ Wrong: "Transform the person into a Viking" ✅ Right: "Change the clothes to be a viking warrior while preserving facial features"
The composition shifts
❌ Wrong: "Put him on a beach" ✅ Right: "Change the background to a beach while keeping the person in the exact same position, scale, and pose"
The style isn’t applied accurately
❌ Wrong: "Make it a sketch" ✅ Right: "Convert to pencil sketch with natural graphite lines, cross-hatching, and visible paper texture"
Core principles
- Be specific: use precise descriptions and avoid vague words
- Edit in steps: break complex changes into several simple steps
- Say what to keep: state explicitly what should stay the same
- Choose your verbs: use “change” and “replace” rather than “transform”
Best-practice templates
Changing an object: "Change [object] to [new state], keep [content to preserve] unchanged"
Style transfer: "Transform to [specific style], while maintaining [composition/character/other] unchanged"
Replacing the background: "Change the background to [new background], keep the subject in the exact same position and pose"
Editing text: "Replace '[original text]' with '[new text]', maintain the same font style"
Remember: the more specific, the better. Kontext is good at understanding detailed instructions and keeping things consistent.